GST !!! Get an idea about GST
What is GST?
GST Stands for Goods and Services Tax.
India is not the only country in the whole world that charges GST but
in Asia only, Malaysia and Singapore are already on board.
France was the first country to introduce and implement GST back in
1954. Since then over 135 countries have adopted the GST regime.
GST is a kind of Mixture of a few Indirect taxes into one new Tax
which is the Goods and Services Tax.
Well, Indian Parliament passed the Goods and Services Tax Act on 29th
March 2017 & with effect from 1st July 2017 Gst was applicable to all
of India except states under special provisions.
GST REGISTRATION !!!
Let’s talk about GST REGISTRATION.
Here we will talk about What is GST registration? Who needs GST
registration? What is the Process of GST registration?
GST Registration is an online process where a business is registered
under Goods and Services Tax.
After successful registration, a unique ID is assigned to the
business. This assigned ID’s name is Goods and Services Tax
Identification Number, You can call GSTIN, in short.
This GSTIN is a 15-digit number and alphabet combined code assigned by
the central government of India.
WHO Should go for GST REGISTRATION
First of all, let's talk about businesses for whom GST Registration is
mandatory irrespective of their turnover
- Supplier of goods Via any E-Commerce portal
- Inter-State Supplier of Goods and Services
- Non-Resident Taxable Person
- Input Service Distributor (ISD)
- Casual Taxable Person:- If Any Business does not have a permanent place for business, they can register themselves as a Casual Taxpayer. It is valid for 90 days only.
- TDS/TCS Deductors
- Online Data Access or Retrieval service provider
- If any individual or Business was registered under any of previous tax laws such as VAT or CST or Service Tax, etc.
- Reverse charge Mechanism
There is a threshold limit if you are from north-eastern states, Himachal Pradesh or Uttarakhand. The threshold is 10 lakhs.
Also, if you are dealing in Ice Cream and other edible ice whether or not containing Cocoa, Pan Masala, All tobacco, and its substitutes, then the threshold limit for getting registration will be Rs. 20 lakhs only and not the upper Rs. 40 lakh limit.
For businesses in the service sector, the turnover limit for a service provider is 20 lakhs. And if you are from special categorized states your limit is 10 lakhs only.
Process Of GST REGISTRATION
Let’s get familiar with the GST registration process. You just need to follow these steps to get your registration done.
- First of all, you need to go to GST official portal which is gst.gov.in Click Services > Registration > New Registration. Also, you can click on “Register Now” Link
- The application is divided into two parts Part A and Part B –
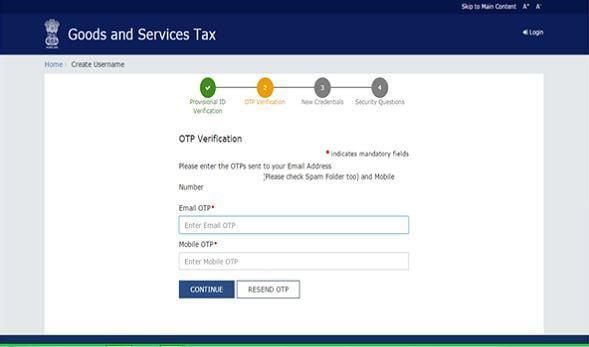
- After this, you will be taken to a new page where you will be asked to enter two OTPs, one that is sent on your phone number and the other one that is sent on your email address.
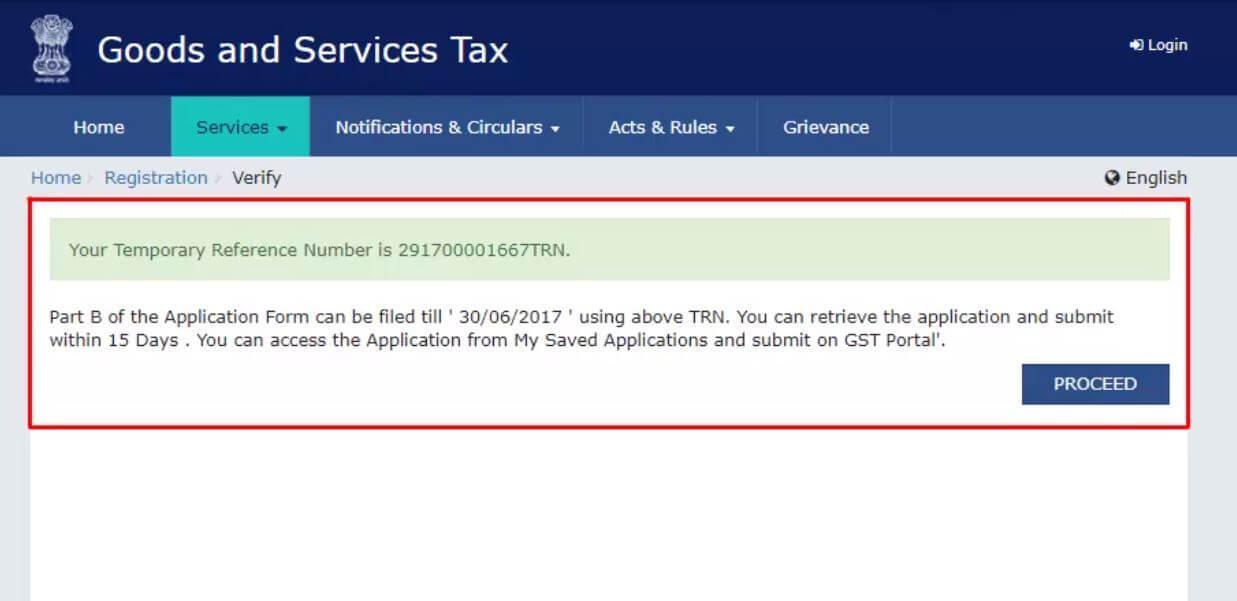
- After successful verification of OTP, a TRN i.e. Temporary Reference Number will be allocated to you. Make sure to note down this number as it will be used to login and complete your application.
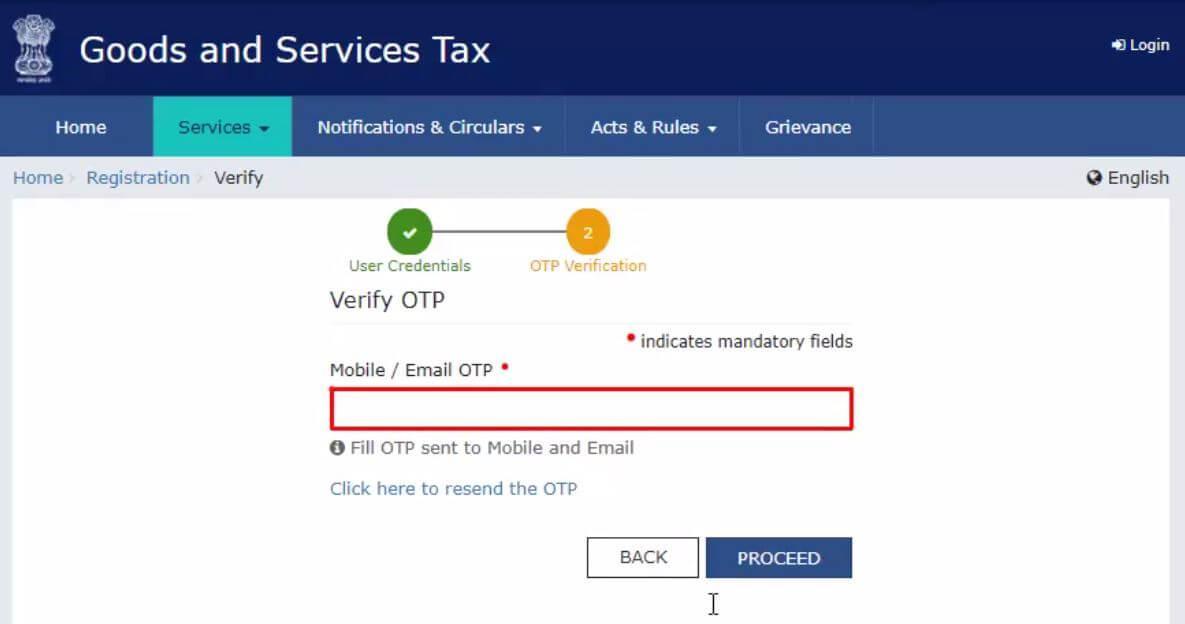
- Now once again you need to go to “New Registration” page but this time you have to select the Temporary Reference Number button.
- Now the portal will send OTP on the registered email address and phone number. This time it will be the same OTP and you need to enter any of them. Click on the button “PROCEED”.
- Now the page you will be taken to will show you “My Saved Application” where the status due date to complete your application will be mentioned. In Action tab, click on Pen like symbol to edit and proceed with your application.

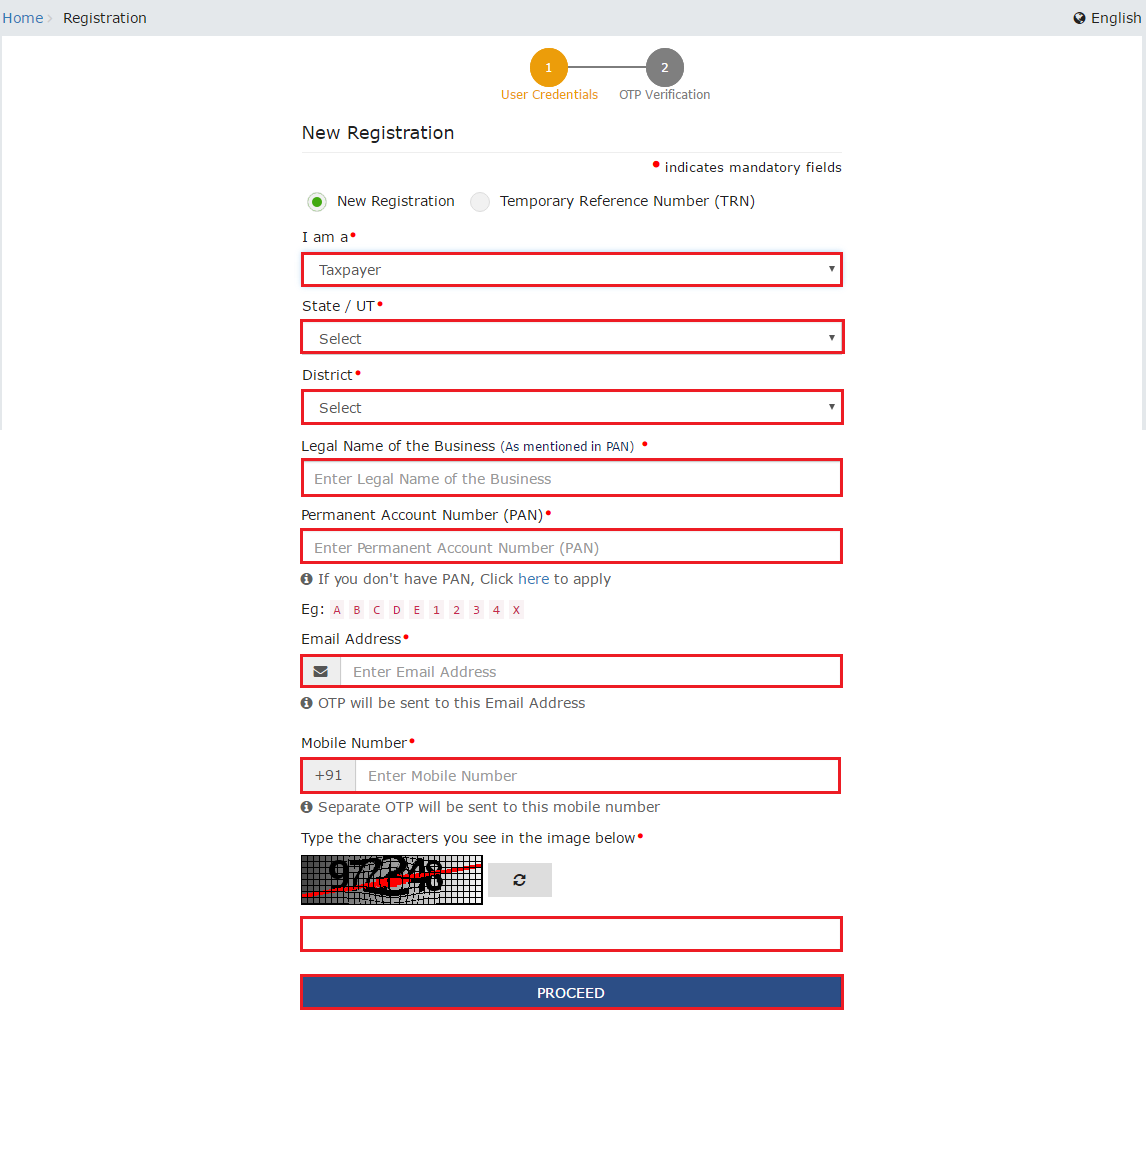
Part A is where fill the basic details.
-
i) Select the New Registration
ii) Select your category which would normally be “Taxpayer”
iii) Select your State/UT
iv) Select your district
v) Enter your name which should be similar to the PAN that you would be mentioning in the next step.
vi) Now enter your PAN.
vii) Now enter your email address and phone number.
viii) Enter the CAPTCHA and click on the proceed button.


Part-B of the Application will begin Now:-
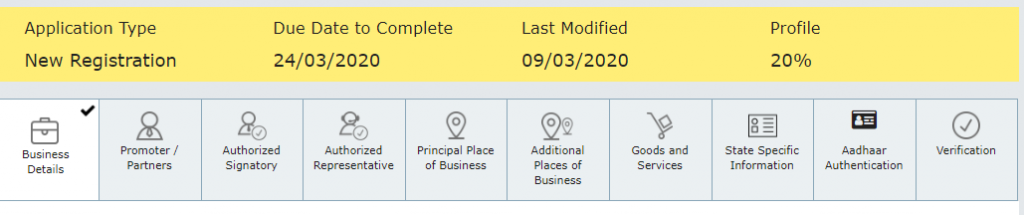
Part-B consists of 10 tabs which all need to be filled.
Just to speeden-up your process, make a note of these things which you should keep by your side so that you are not left stuck in the middle of the process.
- Proof of business (Deed, MoA)
- Basic details of Promoters/Partners such as Name, Address, Phone number (one that is linked with Aadhar Card), email address, PAN, passport size photograph in jpeg format(below 100kb), DIN, accurate Map Location of residential address.
- Same details for the person who will act as Authorised Signatory. Now an Authorised Signatory can either be any of the promoters/partners/directors or can be an employee of the organisation.
- An authorisation letter that gives authority to the Authorised Signatory.
- Details of Authorised representative only if you want to appoint one.
- Details of Principal place of business (Rent/Lease Agreement, Electricity Bill, Municipal Patta, Khasra number as the case may be. In Majority cases you will be needing only either of Rent/Lease Agreement, Electricity Bill)
- Similar details for the additional place of business if you are operating at multiple locations.
- A list of goods and services you will be dealing in.
Now, let’s proceed with the registration process.
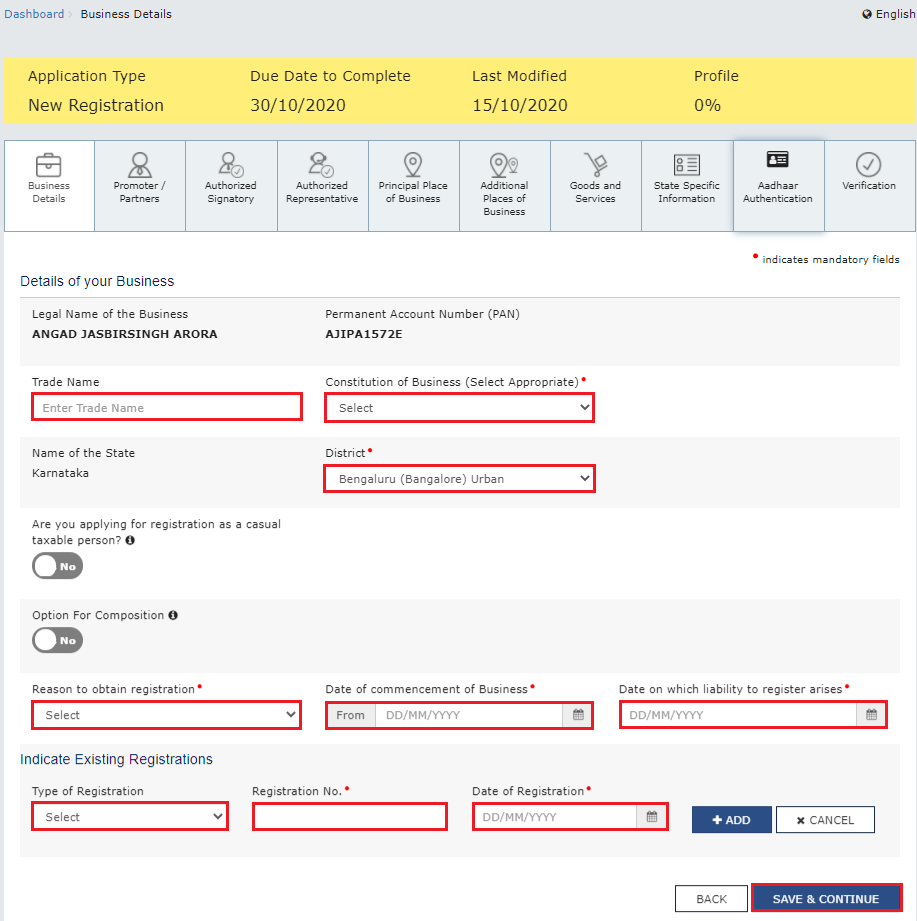
First Tab: Business Details
This tab is selected by default.
Here you have to enter your trade name which might be similar to the legal name or might be different(mostly in case of proprietors).
Select the Constitution of your business.
Select your district.
Now you need to choose the reason for which you are applying for registration. It can be voluntary or any of the others given in the drop-down list.
Mention the date of commencement of business and date on which liability to register arises. Second one won’t be required if the reason for obtaining registration is voluntary.
Indicate the existing registrations, if you have any.
Click on “SAVE & CONTINUE”.
After successful completion of the first tab, the colour of BUSINESS TAB will turn Blue.

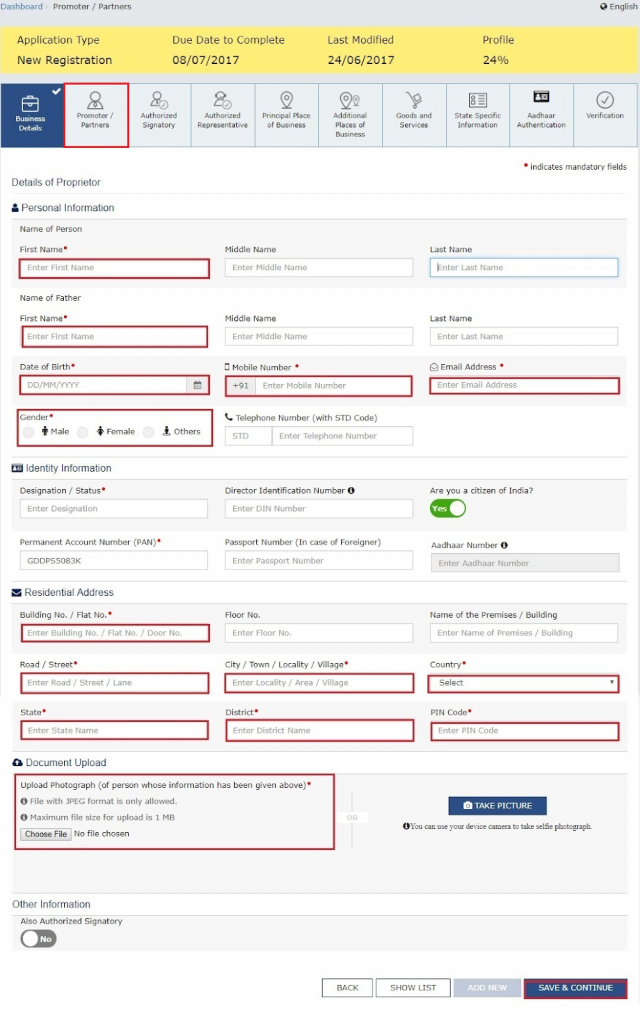
Second Tab: Promoters/Partners
Now that you have successfully made it till here, this tab should be a piece of cake for you if you have all the things handy as we mentioned earlier in this article. All you have to do now is fill them up in their appropriate locations.
After filling details, click on “ADD NEW” if you have multiple promoters/partners/directors to insert their details which will be the case except for proprietorship firms or OPC i.e. One Person Company.
Make sure that if you want to appoint any of these person as Authorised Signatory, then at the time of filling their details, you need to change the default NO option to YES under the heading Other Information where it specifically mentions “Also Authorised Signatory”
Click on “SAVE & CONTINUE”
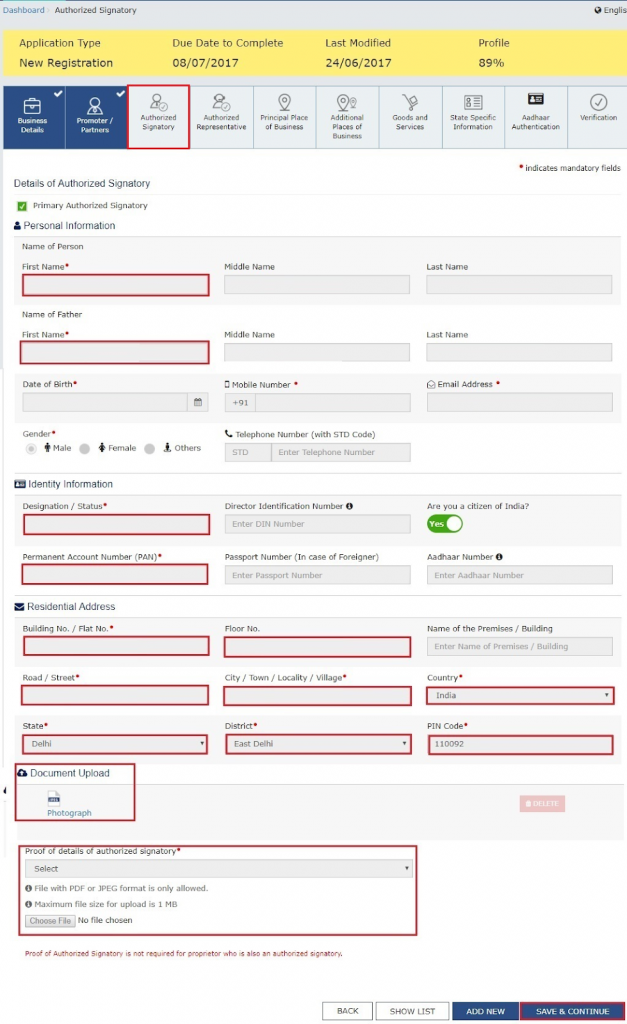
Third Tab: Authorised Signatory
If you have chosen any of the above mentioned persons in Promoters/Partners Tab as “Also Authorised Signatory” then they should appear here and if not then enter the details of the person you want to appoint as Authorised Signatory. There can be multiple Authorised Signatory but you have to select one Primary Authorised Signatory. “Primary Authorised Signatory” checkbox will appear at the top while entering details of the person.
Fourth Tab: Authorized Representative
The details in this tab are NOT MANDATORY. Hence you can skip on this one.
Select “Do you have any Authorised Representative” to YES if you have one.
If the Authorised Representative is a GST Practitoner, you will need to enter his enrolment ID.
In case of “Other”, enter his basic details.

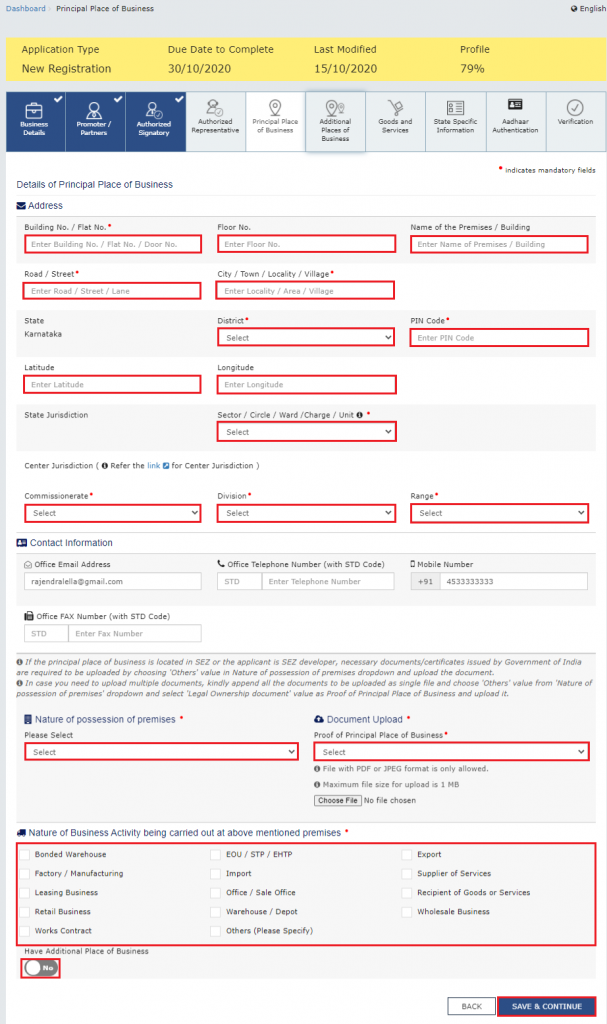
Fifth Tab: Principal Place of Business
Here first of all you need the exact Map Location of your business place. The Map here is quite accurate but might differ from what majority of people are used to which is Google maps. Don’t panic and you can pinpoint your location in just a couple of minutes.
Here you must try to fill all the columns of address as we have seen a few cases where Query was raised by the department just because one or two NON-MANDATORY columns in address were left blank.
After this select your Jurisdiction. You can find it after a little bit of working but yes it is not impossible or too difficult to do so. Just follow the path led by GST Portal you will reach your destination i.e. you will find your Jurisdiction.
Now select “Nature of possession of premises” and upload the relevant document. Again you already have it if you kept all the things in hand which we suggested you should.
You can make two selections here.
For example if the premises is rented, we suggest to select Rent Agreement in First Selection and Electricity bill in second selection to avoid any query for clarification, but it’s up-to you what you want to choose from the list.
Now select one or more of the options under the heading “Nature of business activity being carried out at above mentioned premises”
Select YES for “Have Additional Place of Business” if you have one.
Click on “SAVE & CONTINUE”
Sixth Tab: Additional Places of Business
Information is required to be filled here only if you are operating at multiple places. All the details required here are similar to the ones in the Principal Place of Business. So nothing much to discuss here so that we can avoid redundancy of information.
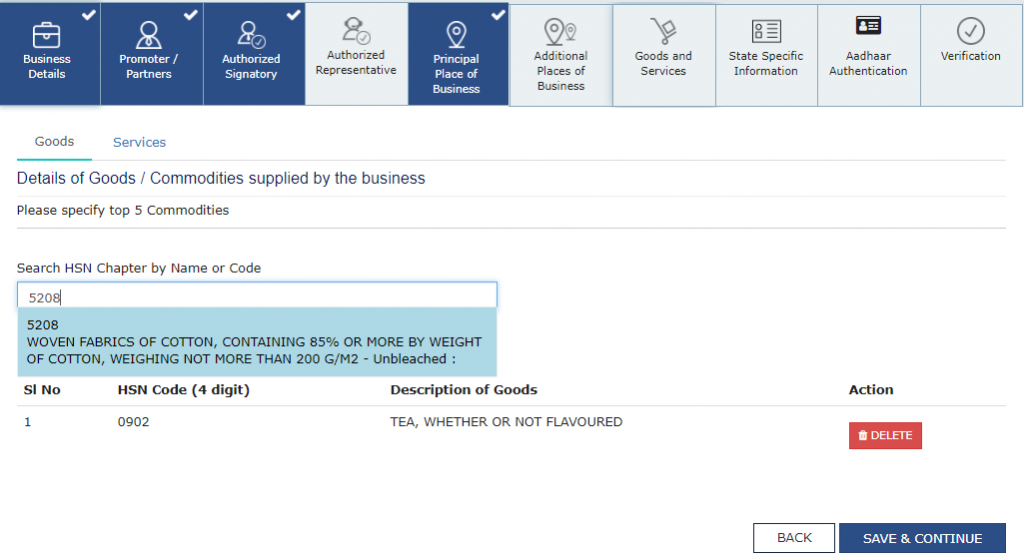
Seventh Tab: Goods and Service
As we mentioned earlier that you need to make a list of the goods and services you are going to offer.
Now either you can look for their HSN code or type the name of your goods or services and the portal itself will give you a suggestion from its database.
You will be required to specify your top 5 goods/services here.
Once you are done with these, click on “SAVE & CONTINUE”
Eighth Tab: State Specific Information
You will need the information asked for only if it already applies to you, otherwise Not.
If yes then enter relevant details in relevant columns.

Ninth Tab: Aadhar Authentication
Select YES at top for opting Aadhar Authentication of Promoters/Partners/Directors and Authorised Signatory for speedy completion of process and to skip physical verification of business except in few mandatory cases.
Select the persons whose authentication needs to be done.
Click of “SAVE & CONTINUE”
Tenth Tab: Verification
Firstly, you need to check the checkbox asking declaration.Then Select the Authorised Signatory
Enter the Place.
Click on Submit with DSC if you are a Company or LLP otherwise you the option of the following
Submit with DSC
Submit with e-Signature
Submit with EVC (Otp)
A pop-up will appear, click on PROCEED.
Click on Sign and enter PIN in case of DSC.
In case of e-Signature, select the service provider and then enter OTP.
In case of EVC, enter OTP.
Now Validate OTP.
A message will appear on the screen stating your successful submission of the application.

What are the benefits of GST registration for the User?
There are a lot of benefits to the person who gets GST registration. A few of them are listed below:
- Competitive edge- GST registration provides you a valid legal identification which can be used to validate yourself as a genuine business-person.
- Avail Input Tax Credit- GST registration holders can avail ITC of the purchases made by them. It can be used by them to reduce outward tax liability. This also eliminates the boundations put by the VAT/CST regime.
- Current Bank Account- GST certificate holders can open a current bank account with a great ease.
- Access to bidding ecosystem - Wherever there’s a requirement of bidding for a tender whether government or private organisation, then GST registration is a must-to-have certificate for eligibility.
- Customer Relationship- Since you have a valid GST certificate to validate your identity, customers can have a greater faith in your business.
Is there any Penalty for not getting registration?
Yes!!As per the GST Act, if you are liable to get GST registration but fails to do same then you can be penalised with a amount which is higher of the following:
- Rs.10,000/- or
- 100% of tax due.
What are the compliances after obtaining GST registration?
After obtaining GST Registration, each assessee has to regularly file GST returns. Returns can be filed monthly or quarterly based on your selected preference.